
Using Your Cell Phone for Yearbook Photography
By Shelly Tomlinson, CJE
The most important part of being a good photographer is thinking like a photographer, rather than worrying about what kind of camera one uses. As a yearbook adviser, I repeat this often. I say it to my beginning journalism students who are worried because they don’t have a DSLR. I also say it to yearbook students who are fighting over the “good” camera or the “big” lens.
Think about some of the basic rules of photography: rule of thirds, varying angles, lighting, color, framing, leading lines and repetition. None of those depend on the camera. They depend on the photographer. They depend on the photographer using what they have available. Whether it’s a $100 point-and-shoot or a $1,000 DSLR, it won’t do any good if it’s sitting on a shelf in the yearbook room. More often than not, what we have with us is a phone, not a camera—and I’ve learned that’s OK.
There are advantages and disadvantages to using cell phones for yearbook photography. The most obvious advantage is students almost always have them handy, and they usually keep them charged. While photo quality is not necessarily comparable to a DSLR, many phones today have as good or better features than my class Nikon point-and-shoot cameras.
Remember what Wayne Gretsky said, “You miss 100% of the shots you don’t take.” Train your students to think of their phone as a camera, and the probability they will take those shots goes up exponentially.
Tips To Help Students Get Yearbook Quality Photos With An iPhone
• Keep your lens clean. Before snapping a shot, give the lens a quick wipe using a soft cloth – one to clean glasses or made specifically for electronics is ideal. Fingerprints are a big problem, and the oil from our fingers smears easily. Saliva, though kind of gross, actually does a great job cleaning them.
• Know your phone. There are hundreds of smartphone camera tutorials on YouTube. It’s definitely worth the time to watch videos for your specific phone and operating system.

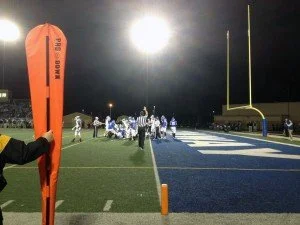
• Do not zoom. Get physically closer instead of relying on the digital zoom. On a digital camera, digital zoom works the same as cropping and enlarging a photo in a graphics program. You lose quality and the ability to enlarge it later. If you can’t get closer, get creative with your shots – capture the cheerleaders’ reactions to a great play instead of the player on the field.
• Use two hands, and turn the camera horizontally for the best control. Just like with a DSLR camera, the steadier your phone, the less blurry or out-of-focus your photos will be. Clip two binder clips on one side and set it on the metal “legs” to make an impromptu tripod.
• Use burst mode for action. The newest iPhones can take up to 10 photos per second with a feature called “burst mode.” Begin by locking your focus and exposure so all your photos will be consistent. To do this on an iPhone, touch the HDR option and hold it down until you see the yellow box appear. Allow it to focus on the area where you will be shooting.
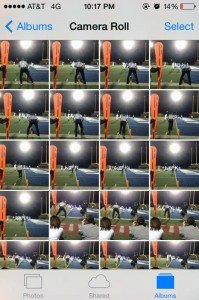
Once it’s locked, your settings will stay the same even if your subject moves. Then, press and hold the shutter button to take multiple photos quickly.
• Use the grid. The grid is especially helpful for new photographers still learning rule of thirds. Doing it now will keep them from having to crop it later—and possibly losing quality.
• Flash=red eye and shadows. It’s always best to shoot without the flash whenever possible. More and more, smart phones cameras are becoming more advanced at shooting in low light, but if it’s too dark to shoot without the flash, position a friend nearby. Have them hold up their phone with the flashlight on and pointed toward your subject. The light is more diffused and natural in the photo.

• If you have HDR, use it. Phones with this feature give you two photos when HDR is turned on – one with exposure adjustments and one without. (This can be turned off in the phone’s settings.) Typically, colors in HDR photos will be more vibrant, as it makes sure photos are never under or overexposed. HDR is especially great for landscapes, portraits in harsh sunlight or when the setting has very low light.
Use in conjunction with burst mode for action shots, but remember, when using HDR, the camera takes two or three successive photos. It takes longer to capture the whole image—and uses a LOT of battery power.
• Know your resolution. For the most part, the higher the resolution (or megapixels), the more detailed the picture will appear – and better it will print. For yearbook, the best range is between 6-12 MP. Too small, and the photos will be grainy. Too large, and there may be issues with uploading and storage.
• Here’s a cheat sheet:
3MP = maximum 5″ x 7″ photo (okay if it’s kept small)
6MP = maximum 6.5″ x 10″ photo (plenty big for candids)
10MP = maximum 8.5″ x 14″ photo (perfect for full page)
12MP = maximum 9.7″ x 14.5″ photo (can crop portion and enlarge to 5×7 without becoming pixelated
• The iPhone 4 through the 6+ have 8 MP cameras, along with the Samsung Galaxy S3. The Galaxy S4 has 13 MP, and the S5 has 16 MP. Keep in mind the forward facing camera, or the one used for selfies, is only 1-2 MP on all of these, and generally will not work for yearbook.
When using a smartphone camera, the most important thing is to try. We can’t use every picture every photographer takes in our yearbooks, anyway, but we certainly can’t use ones that were never taken. It doesn’t matter what kind of camera they’re using. What matters is having fun and getting better with every shot.
Shelly Tomlinson is the yearbook adviser at Conway High School in Conway, Arkansas. She has a bachelor’s degree in journalism from Arkansas State University. A former newspaper reporter, she has several awards for writing and photography. She is also a Certified Journalism Educator through the Journalism Education Association and a 2010 American Society of Newspaper Editors Reynolds High School Journalism Institute Fellow.