
Formatting Your PSPA CD
What is a PSPA CD?
The school picture industry offers a variety of products and services to students and schools. These are often used in conjunction with yearbooks and other products. Since individual students and schools employ different photographers to take photos, there is a need for an easy way to combine the products and services of these suppliers.
When multiple photographers generate CD/DVDs in their own formats, it’s more difficult and time-consuming to coordinate the data and images for yearbook publishing. For this reason, the Professional School Photographers Association (PSPA) has established Digital Data & Image Format Guidelines for use by school photographers to make this process as efficient as possible.
These guidelines include detailed instructions on naming conventions and file setup for these discs in order to be compatible with most yearbook software, including Creator Studio(TM). Your discs should already be set up correctly when you receive them from your photographer, but you can use the guide below if you have any issues getting them to work with our software.
Your accredited school photographer should already be following the guidelines below for formatting your school portrait data.
Editing information on your PSPA CD
1. Exporting the files
Many CD/DVDs are read-only, so before you can make any changes to your PSPA disc, you’ll want to save the contents into a folder on your computer. We recommend using an easy-to-find location, like your desktop. Simply create a new folder and copy or extract everything from your PSPA disc into that folder.

While there are a few optional files that can be included in a PSPA directory, the two elements that must be present include an index.txt file, and a folder containing the portraits. When you access your CD, it will likely look something like this:

2. Locating portrait filenames
Inside your PSPA CD, you will see a folder that contains all of your image files. Sometimes portraits will be organized and nested inside of other folders; especially when dealing with a larger school.
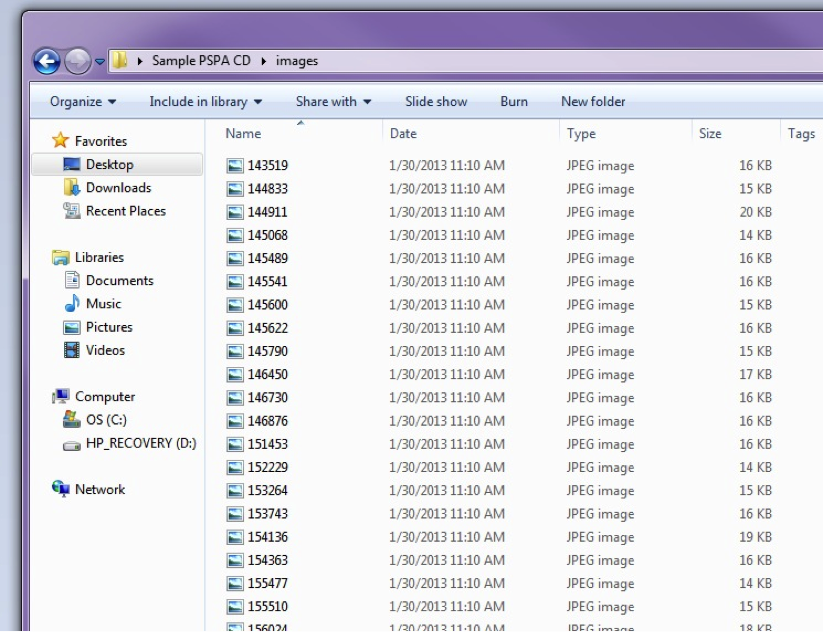
The important part is that the index file is separate from the folder(s) containing the images, and that they are all present on the CD itself. When you open the images folder, you will see each portrait with a unique name. It is strongly recommended that you don’t edit these filenames in any way.
3. Viewing the INDEX file
The INDEX.TXT is a REQUIRED file. Its purpose is to contain all the data records to be included in the published yearbook product. Part of each data record contained in the INDEX.TXT file is a reference to the associated subject image. It’s this file that the yearbook producer will use to incorporate data and associated images into the yearbook product.
The image names in this INDEX.TXT file must match the names of the portraits in the ‘Images’ directory.

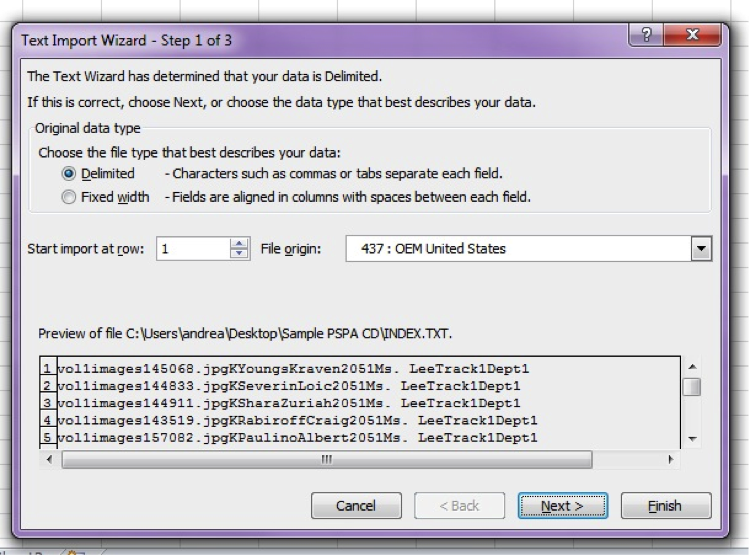
The text is a little hard to follow when viewed through Notepad, so the easiest way to fix this would be to open it up in Microsoft Excel instead.
When you first open up INDEX.TXT through Microsoft Excel, you may receive a prompt warning you that your text is Delimited. Delimited data means that fields are separated by commas or tabs, and we want to preserve this when we import it into Excel. These tabs help Creator Studio(TM) determine which fields are separate. You can follow the prompts below for an example (generally the default values are fine):

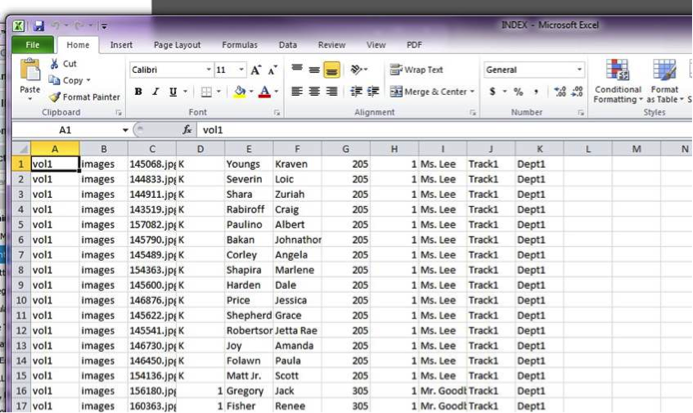
Once your file is imported into Excel, each value will be listed in separate columns, and is much easier to read and adjust. Feel free to edit any of these values as needed.
4. Editing the INDEX.TXT file
The order of your information columns determines the order that the information is populated into Creator Studio(TM). If Creator Studio(TM) is finding the photos but importing them with information in the incorrect fields (i.e. Surnames in the Grade field,) it’s likely that the column order just needs to be adjusted. Your columns need to be in the following order:
Volume Name – Volume name is an arbitrary name, but it must end with a number to account for multiple CD/DVD volumes. You will likely not need to edit this column
Image Folder – The exact name of the folder holding the images
Image File Name – The file name for an image, with extension. Example: “00001.jpg” Image file names MUST be unique for each image and must match the filenames contained in the Images directory
Grade – The grade assigned to the student, if applicable. Example: “4”
Last Name – The student’s last name. Example: “Smith” or “Jones Jr.”
First Name – The student’s first name. Example: “Andrea”
Homeroom – The student’s homeroom number. Example: “AA”
Period – The student’s period, if applicable. Example: “6”
Teacher Name – The name of the student’s teacher. Example: “Ms. Lee”
Track – The name for the student’s track (usually used in year-round schools.) Example: “Special Needs” or “A”
Department – Indicates which role the individual plays at the school. Recommended values are “Faculty”, “Administration”, “Support Staff”, and “Student”
Your INDEX file does not need to contain data for all of the listed sections. However, if you choose to leave some of this information blank, you need to make sure to include the blank column where that information should be. An example can be seen below:

Once you’ve made your changes, you should be able to save your file and import your photos into your yearbook software.